


Getting started
Front seats
Manual adjustments
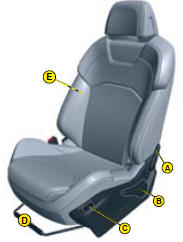
A. Adjustment of the backrest angle.
B. Adjustment of the seat height and angle.
C. Heated seat control.
D. Longitudinal adjustment of seat.
E. Adjustment of the backrest lumbar support.
Electrical adjustments
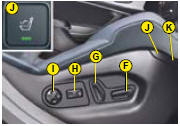
F. S eat height and slide adjustments.
G. Adjustment of the backrest angle.
H. Adjustment of top of backrest.
I. Adjustment of 2 axis lumbar support.
J. Massage function.
K. Heated seat control.
Seat belt height adjustment
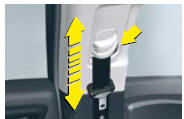
The correct positioning of the belt strap is through the middle of the shoulder. See “Seat belts”.
To adjust the seat belt for height, compress the control and slide it in the desired direction.
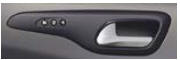
Memorisation
The Memorisation function allows you to programme the driver’s seat, rear view mirrors and air conditioning settings.
Electric exterior rear view mirrors
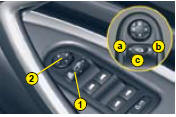
1. S election of rear view mirror:
a - Left hand side.
b - Right hand side.
c - Foldback / Deployment.
2. Directional control for mirror selected
Automatic electrochrome rear view mirror
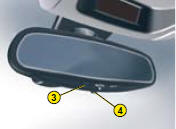
This automatically and progressively adapts to day-time or nighttime use.
Operation Switch on the ignition and press button 4.
Warning lamp 3 on: automatic mode.
Warning lamp 3 off: automatic mode stopped. The mirror remains in its lightest definition.
Steering column adjustment
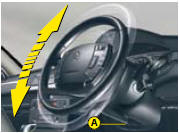
With the vehicle at rest, unlock the steering wheel by pushing control A forwards.
Adjust the height and the reach of the steering wheel, then lock the position by pulling the lever upwards.
See also:
Audible and/or visual rear parking assistance
This system consists of four proximity
sensors, located in the rear bumper.
This detects any obstacle (person, vehicle,
tree, gate, etc.) behind the vehicle,
except obstacles located just below ...
Activation
The airbags are triggered simultaneously,
unless the passenger's front airbag
is disarmed, in the event of a serious
front impact applied to all or part of the
front impact zone A , in the longitu ...
Exterior features
Zenith windscreen
This large windscreen provides incomparable
visibility and light in the passenger
compartment.
Temporary puncture repair kit
This kit is a complete system consisting
of a com ...