


Service indicator
System which informs the driver when the next service is due, in accordance with the manufacturer's servicing schedule. The point at which the service is due is calculated from the last indicator zero reset.
It is determined by two parameters:
- the distance travelled,
- the time elapsed since the last service.
More than 600 miles (1 000 km) remain before the next service is due
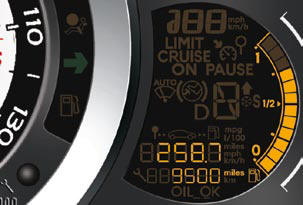
For 5 seconds after the ignition is switched on, the spanner symbolising the service operations comes on. The distance recorder display line indicates the distance remaining before the next service is due.
Example: 4 800 km remain before the next service is due.
For 5 seconds after the ignition is switched on, the display indicates:

5 seconds after the ignition is switched on, the spanner is switched off ; the distance recorder resumes its normal operation. The display then indicates the total and trip distances.

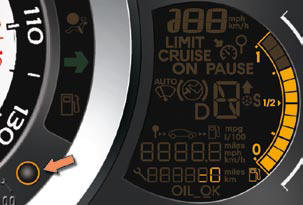
Less than 600 miles (1 000 km) remain before the next service is due
Example: 400 miles (900 km) remain before the next service is due.
For 5 seconds after the ignition is switched on, the display indicates:

5 seconds after the ignition is switched on, the distance recorder resumes its normal operation. The spanner remains on to indicate that a service must be carried out soon.

Service overdue
For 5 seconds after the ignition is switched on, the spanner fl ashes to indicate that the service must be carried out as soon as possible.
Example: the service is overdue by 300 km.
For 5 seconds after the ignition is switched on, the display indicates:

5 seconds after the ignition is switched on, the distance recorder resumes its normal operation. The spanner remains lit .

The distance remaining may be weighted by the time factor, depending on the driver's driving habits.
Therefore, the spanner may also come on if you have exceeded the two year service interval.
Service indicator zero reset
After each service, the maintenance indicator must be reset to zero.
The procedure for resetting to zero is as follows:
- switch off the ignition,
- press and hold the trip distance recorder zero reset button,
- switch on the ignition; the distance recorder display begins a countdown,
- when the display indicates "=0" , release the button; the spanner disappears.
Following this operation, if you wish to disconnect the battery, lock the vehicle and wait at least fi ve minutes for the zero reset to be taken into account.
Retrieving the service information
You can access the service information at any time.
Press the trip distance recorder zero reset button.
The service information is displayed for a few seconds, then disappears.
Service overdue
For 5 seconds after the ignition is switched on, the spanner fl ashes to indicate that the service must be carried out as soon as possible.
Example: the service is overdue by 300 km.
For 5 seconds after the ignition is switched on, the display indicates:

5 seconds after the ignition is switched on, the distance recorder resumes its normal operation. The spanner remains lit .

The distance remaining may be weighted by the time factor, depending on the driver's driving habits.
Therefore, the spanner may also come on if you have exceeded the two year service interval.
Service indicator zero reset

After each service, the maintenance indicator must be reset to zero.
The procedure for resetting to zero is as follows:
- switch off the ignition,
- press and hold the trip distance recorder zero reset button,
- switch on the ignition; the distance recorder display begins a countdown,
- when the display indicates "=0" , release the button; the spanner disappears.
Following this operation, if you wish to disconnect the battery, lock the vehicle and wait at least fi ve minutes for the zero reset to be taken into account.
Retrieving the service information
You can access the service information at any time.
Press the trip distance recorder zero reset button.
The service information is displayed for a few seconds, then disappears.
See also:
Overview
Recognised as one of the best-styled models in its segment, the Citroen C5
has been subtly upgraded. The changes enable the car to keep all its character
while making it immediately visible and re ...
MP3 CD source
MP3 CDs
The MP3 format (MPEG 1,2 & 2,5 Audio Layer 3) is an audio compression standard
that permits recording of 10 times as many musical files on one CD.
Your radio only plays back files whic ...
Locking the vehicle with
exterior protection alarm only
Deactivation of the interior
volumetric protection
Switch off the ignition.
Within ten seconds, press button A
until the indicator lamp is lit continuously.
Get out of the vehicle.
Lock o ...