


Headlamps
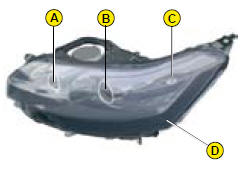
Front headlamp unit with Xenon bulbs (D1S)
Bulbs:
A S idelamp: W5W
B Dual-function Xenon lamp (dipped/main): D1S
C A ngular lighting: HP19
D Daytime-running lamp: HP24
For the maintenance of the front headlamp unit and the changing of HP19, D1S and
HP24 bulbs, contact a CITROËN dealer.
Sidelamp
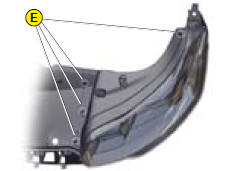
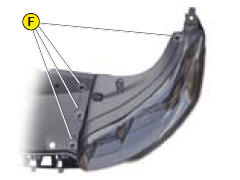
1 Lift up the pegs E to remove the cover on the headlamp.
2 Remove the protective cap F.
3 Pull the bulb holder to remove it.
4 Replace the bulb and replace the bulb holder.
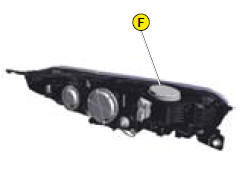
5 Replace the protective cap F.
6 Replace the cover and fix it in place using the pegs E.
Front headlamps fitted with Xenon bulbs: Because of risks of electrocution,
we advise you to contact a CITROËN dealer if there is any problem.
You are advised to change the D1S bulbs at the same time, if one of them has failed.
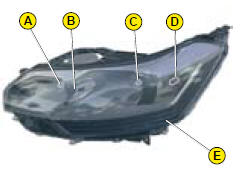
HEADLAMP UNIT
Bulbs:
A M ain beam: H1
B S idelamp: W5W
C Dipped beam: H7
D Bend lighting: H7
E Daytime-running lamp: HP24 For the maintenance of the front headlamp unit and
the changing of HP24 bulbs, contact a CITROËN dealer.
Main beam
1 Lift up the pegs F to remove the cover on the headlamp.
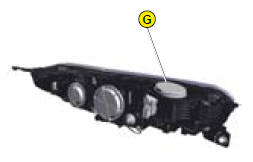
2 Remove the protective cap G.
3 Disengage the retaining spring.
4 Remove the bulb and replace it, paying attention to the direction of fitting.
5 Replace the retaining spring.
6 Replace the protective cap G.
7 Replace the cover and fix it in place using the pegs F.
Sidelamp
1 Lift up the pegs F to remove the cover on the headlamp.
2 Remove the protective cap G.
3 Pull the bulb holder to remove it.
4 Replace the bulb and replace the bulb holder.
5 Replace the protective cap G.
6 Replace the cover and fix it in place using the pegs F.
Halogen bulbs must not be changed until they have been off for a few minutes
(risk of serious burns).
Do not touch the bulb directly with your fingers, use a lint-free cloth.
It is essential that only anti-U.V. type bulbs are used in order not to damage the
headlamp.
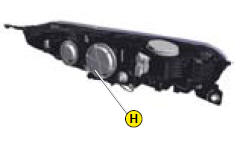
Dipped beam
1 Lift up the pegs F to remove the cover on the headlamp.
2 Remove the protective cap H.
3 Disconnect the connector by pressing it between the thumb and index finger.
4 Free the bulb from its two metal clamps.
5 Take out the bulb.
6 Replace the bulb, exerting a slight axial force.
7 Reconnect the connector, until it is all the way in.
8 Replace the protective cap H.
9 Replace the cover and fix it in place using the pegs F.
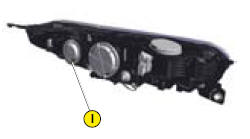
Bend lighting
1 Lift up the pegs F to remove the cover on the headlamp.
2 Remove the protective cap I.
3 Disconnect the connector by pressing it between the thumb and index finger.
4 Free the bulb from its two metal clamps.
5 Take out the bulb.
6 Replace the bulb, exerting a slight axial force.
7 Reconnect the connector, until it is all the way in.
8 Replace the protective cap I.
9 Replace the cover and fix it in place using the pegs F.
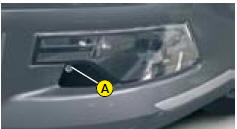
Front direction indicator
1 Remove the fixing screw of cover A using a torx tool, tip the cover over and
remove.
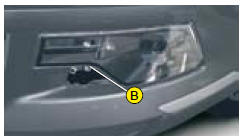
2 Remove the fixing screw of lamp B using a torx tool and pull the headlamp unit
to remove it from the bumper.
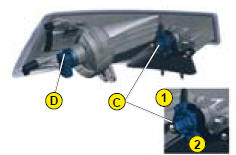
3 Detach the bulb C by pressing on bars 1 and 2.
4 Disconnect the connector (pull whilst pressing on the grey tongue using a flat
screwdriver).
5 Replace the bulb.
6 Connect the connector (push the grey tongue in well).
7 Replace the headlamp unit in the bumper.
8 Screw the headlamp unit in.
9 Position the cover using its guides and screw in.
Bulbs: HP24W
Front foglamp
1 Remove the fixing screw of cover A using a torx tool, tip the cover over and
remove.
2 Remove the fixing screw of lamp B using a torx tool and pull the headlamp unit
to remove it from the bumper.
3 Disconnect the connector D.
4 Remove the bulb by performing a quarter of a turn.
5 Replace the bulb.
6 Connect the connector D.
7 Replace the headlamp unit in the bumper.
8 Screw the headlamp unit in.
9 Position the cover using its guides and screw in.
Bulbs: H8
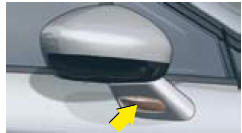
Side repeater
The side repeater is sealed.
If the bulb is faulty, replace the side repeater.
Contact a CITROËN dealer.
When replacing, be careful not to pinch the electrical cables.
See also:
Mats
Removable component which protects
the carpet against exterior dirt.
Fitting
When fi tting the mat for the fi rst time,
on the driver's side, use only the fi xings
provided in the wallet attached ...
Starting
Manual gearbox
Ensure that the gear lever is in the neutral position.
Do not touch the accelerator.
For Diesel engines: Turn the key to the drive position. Wait for the preheater
warning lamp to ...
MP3 CD source
MP3 CDs
The MP3 format (MPEG 1,2 & 2,5 Audio Layer 3) is an audio compression standard
that permits recording of 10 times as many musical files on one CD.
Your radio only plays back files whic ...