


Changing a wheel
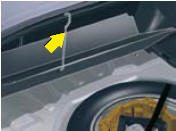
Access to the spare wheel
To access the spare wheel
1 Lift up the boot floor using the strap (saloon) or the retractable handle (Tourer).
2 Fold back the boot carpet (saloon).
3 Attach the hook to the upper section of the boot (in the middle of the boot
pillar).
4 To remove the spare wheel, detach the strap then push the wheel forwards so
as to be able to lift it.
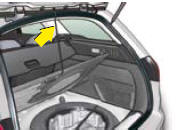
To reposition the spare wheel
To put the spare wheel back in the boot
1 Position the spare wheel flat in the boot, then pull it towards you.
2 Next place the toolbox inside the wheel, then secure the assembly with the
belt.
3 Release the strap to return the boot floor to its initial position.
Tyre pressures
The tyre pressure is indicated on the label located on the left-hand door centre pillar. On this label, the pressures are specified, according to the vehicle load.
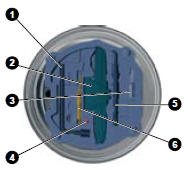
Tools
The tools are to be found in a protective holder inside the spare wheel. Pull back the retaining strap to have access.
1 Handle
2 Jack
3 Tool for the removal/refitting of bolt protectors
4 Centring guide
5 Towing eye
6 Moveable chock
Removal
1 Park the vehicle on stable, firm ground that is not slippery.
Apply the parking brake.
2 If your vehicle is equipped with “Hydractive III+” suspension, with the engine running at idle, adjust the ground clearance to its maximum height. See chapter “Hydractive III+ Suspension”.
3 Switch off the ignition and engage first gear or reverse gear depending on any slope (for a vehicle with automatic gearbox, select position P).
4 If your vehicle is fitted with “Hydractive III+” suspension, position the chock, whichever direction the gradient may be in, in front of the front wheel diametrically opposite to the one to be replaced.
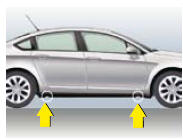
5 Position the jack at one of the four jacking-points provided on the subframe close to the wheels, then use the handle to unwind the jack until it reaches the ground.
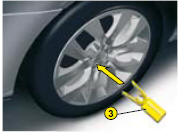
6 Remove the protector from each bolt using tool 3.
7 Slacken the wheel bolts.
8 Continue to extend the jack until the wheel is a few centimetres off the ground.
9 Undo the bolts, remove the wheel.
Before positioning the jack :
Always adjust the vehicle’s ground clearance to the “maximum height” position and
retain this adjustment for as long as the jack is under the vehicle (do not use
the hydraulic adjustments).
Immobilise your vehicle on horizontal, stable and nonslippery ground.
Ensure that any passengers have left the vehicle and are in a safe place.
Never get underneath the vehicle if it is supported only by the jack.
The jack and all of the tools are specific to your vehicle.
Do not use them for any other applications.
Have the original wheel repaired and refitted as soon as possible.
Spare wheel
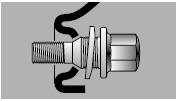
Your vehicle may be fitted with a different spare wheel to those on the vehicle. When fitting the spare wheel, it is normal to notice that the wheel bolt washers do not come into contact with the wheel rim.
The spare wheel is secured by the conical tapering of the wheel bolt’s shaft.
When refitting the original wheel, ensure that the wheel bolt contact surfaces are clean and in good condition.
Refitting a wheel
1 Fit the wheel on the hub, using the centring guide. Make sure that the contact
surface between the hub and the wheel is clean.
2 Screw in the bolts but do not fully tighten them.
3 Lower the jack and remove it.
4 Tighten the wheel bolts, using the wheelbrace.
5 Refit the protectors on the bolts.
6 Return the ground clearance to the normal position. See chapter “Hydractive
III+ Suspension”.
7 Ensure the tyre pressure is correct (see “Vehicle identification”) and have
the balancing checked.
Wheel equipped with deflation detection sensor
Such wheels have tyre pressure sensors. It is essential to have repairs carried out by a CITROËN dealer.
Anti-theft bolts
Each wheel is equipped with one anti-theft bolt.
To remove it 1 Remove the protector using tool 3.
2 Use the anti-theft socket with the handle.
If your vehicle is fitted with a spare wheel of a different size to those
on the vehicle, you must not exceed 80 km/h (50 mph) whilst using the spare wheel.
The wheel bolts are specific to the type of wheel.
If the type of wheel is changed, check with your CITROËN dealer that the wheel
bolts are compatible with the new wheels.
Note: take care to note down the code number engraved on the head of the anti-theft
bolt socket. This will enable you to obtain replacement anti-theft bolt sockets
from a dealership.
See also:
General functions -Audio adjustments
On / Off
With the key in Drive position M, press on control A to switch the radio on or
off.
Note: If the radio was on the last time you switched off the ignition, it will
resume automatically w ...
Anti-intrusion alarm
The anti-intrusion alarm provides:
Exterior perimeter protection by means of detectors on the vehicle access points
(doors, boot, bonnet).
Electrical supply protection.
Interior volumetric prot ...
Fuel tank
1. Opening the fuel fi ller fl ap.
2. Opening and hooking the fuel fi ller
cap.
Tank capacity:
- approximately 50 litres (petrol),
- approximately 45 litres (Diesel). ...