


Changing a wheel
Access to the spare wheel
Lift the boot floor.
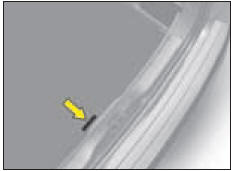
Dimension of the spare wheel
If your spare wheel is of a different dimension to those on the vehicle (identified by a label), it is essential to use it only on a temporary basis, to drive not above 80 km/h (50 mph) and to have the original wheel refitted as soon as possible.
Tyre pressures
This is indicated on a label in the front door aperture.
Switch on your hazard warning lamps. Never get underneath the vehicle if it is supported only by the jack; use an axle stand. The jack is designed specifically for your vehicle, do not use it for other applications. Refit the repaired original wheel as soon as possible. With a spare wheel fitted, drive with caution.
Light alloy wheels
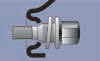
If your vehicle is equipped with light alloy wheels and a steel spare wheel, then if fitting the latter it is normal to note that the heads of the wheel bolts do not come to bear on the wheel rim. The steel spare wheel is secured by the conical tapering of the wheel bolts’ shafts, see diagram. When refitting the light alloy wheel, ensure that the wheel bolt heads are in undamaged condition.
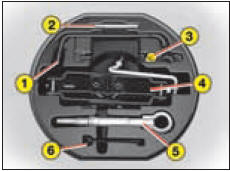
Tools
The tools are located in a protective holder in the spare wheel, remove the strap to gain access.
1 - Wheelbrace
2 - Centring guide
3 - Tool for removing/refitting wheel bolts
4 - Jack with handle
5 - Removable towing ring
6 - Tool for bolt protectors on aluminium wheels
Removing the wheel
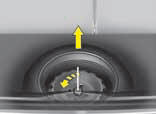
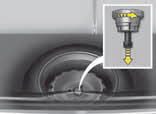
- Undo the yellow central screw by a quarter turn.
- Raise the spare wheel towards you rearwards.
- Remove the wheel from the bootspace.
Repositioning the wheel
- Refit the wheel in place.
- Undo the yellow central screw by a few turns, then position it at the centre of
the wheel.
- Do up the central screw until tight so that the wheel is securely retained in
place.
- Refit the wheel in place. - Undo the yellow central screw by a few turns, then position it at the centre of the wheel. - Do up the central screw until tight so that the wheel is securely retained in place.
Removal
1 - Park the vehicle on stable, firm ground. Apply the handbrake. Switch off
the ignition and engage first gear or reverse gear, depending on any slope (for
vehicles with automatic gearbox, select position P).
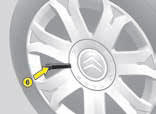
2 - Detach the embellisher using the wheelbrace 1 by pulling close to the valve.
For vehicles with aluminium wheel rims, slide the removal tool 6 into the slot in
the central embellisher and apply firm leverage to detach.
3 - Slacken the wheel bolts. For vehicles with aluminium wheels, slacken the anti-theft
nut using the tool provided.
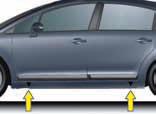
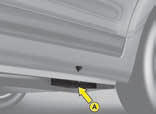
4 - Position the jack under the bodyshell, exactly as in the illustration, at
the mark A (in the recess in the sill member) closest to the wheel that is to be
replaced.
5 - Deploy the jack 4 until its base is in contact with the ground. Make sure that
the base of the jack is vertically below the jacking point used.
6 - Raise the vehicle.
7 - Remove the bolts and disengage the wheel.
Make absolutely sure that the occupants have left the vehicle and are in an area that ensures their safety.
Refitting
1 - Position the wheel with the aid of the centring guide.
2 - Do up the 3 bolts by hand and remove the centring guide.
Position the 4th bolt.
3 - Do pre-tightening with the wheelbrace 1.
4 - Retract the jack 4 and disengage it.
5 - Tighten the wheel bolts using the wheelbrace 1.
6 - Reposition the embellisher, commencing by placing the slot at the valve, pressing
it home with the palm of your hand. For vehicles with aluminium wheels, refit the
bolt protector.
7 - Stow the tools and the wheel in the boot.
8 - Check the tyre pressure and also have its balancing checked.
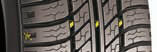
Wear indicators
Check the tread depth frequently. Minimum legal depth: 1.6 mm. Check the wear indicators and the tread depth regularly as worn tyres have reduced grip. The wear indicators show when a tyre is at its safe wear limit.
On slippery surfaces, drive prudently. Make sure that all 4 tyres are always in good condition and that the tyre pressures (including for the spare wheel) are always set correctly.
Under-inflated tyres can overheat, leading to structural damage and the risk of a blow-out. Impacts with kerbs, potholes or hidden obstructions in the road can cause internal damage and premature failure of the tyre. Such impacts can also cause misalignment of the steering geometry and subsequent rapid tyre wear.
Advice
We therefore recommend that you have the tyres and suspension geometries checked after any such incidents. Prolonged driving on poor surfaces may be the cause of damage which may only become evident at a later date. If replacing your tyres, it is essential to use the tyre sizes that are recommended for your vehicle. Contact a CITROËN dealer.
Inspect the tyres regularly for wear and damage such as cuts, cracks or bulges, etc. Remove any foreign bodies (stones, pieces of metal) that may have pierced the tyre. They could cause further damage to the tyre carcass. Correctly inflated tyres provide:
Optimum roadholding.
Precise, light steering.
Improved fuel economy.
Increased tyre life.
Use the tyre pressures recommended by CITROËN. Check the tyre pressures when the tyres are cold, on a frequent basis.
Never reduce the pressure of a hot tyre
Puncture
A punctured tyre should always be removed from the rim and thoroughly examined for any secondary damage before attempting any repair. When a repair is possible, it should be carried out as soon as possible to prevent further damage to the tyre. Tyre repair should be carried out by a tyre specialist who will assume responsibility for the repair.
See also:
USB reader
This connection box, consisting of a
JACK socket and a USB port, is located
on the centre console.
It permits the connection of portable
equipment, such as a digital audio player
of the iPod ® ...
Petrol engines 3.0i V6
1. Screen wash and headlamp wash reservoir.
2. Power steering and suspension fluid reservoir.
3. Engine coolant reservoir.
4. Engine oil gauge.
5. Engine oil topping-up.
6. Brake fluid reservoi ...
From outside
After unlocking the vehicle using the
remote control or the key, pull the
door handle. ...