


Puncture kit
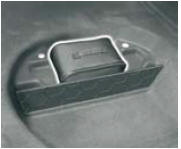
Puncture kit
The puncture repair kit is located in the boot, underneath the tool kit.
The puncture repair kit is a complete system including a compressor and a setting product.
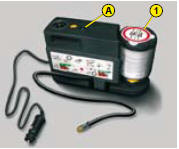
Using the puncture repair kit
1 Remove the sticker found in the kit, then stick it on the steering wheel to remind you that you are driving with a wheel that is only fit for temporary use and that your speed is therefore limited.
2 Connect the flask 1 to the valve of the tyre to be repaired.
3 Connect the electric cable to one of the vehicle's 12V sockets.
4 With the engine running, start the compressor by pressing on button A until the tyre pressure reaches 2,0 bars. If you cannot reach a pressure of 2 bars, the tyre is not repairable.
5 Remove and store the compressor.
6 Drive off immediately, for a few miles at reduced speed, to allow the puncture repair to set.
7 Adjust the tyre pressure using the compressor according to the recommendations for the vehicle, and check that there is no air escaping (no loss of pressure). If you cannot reach a pressure of 2 bars, the tyre is not repairable.
8 Do not exceed 11 0 km/h (68 mph).
The tyre must be examined, then repaired or replaced as soon as possible by a professional.
Warning, the flask of puncture repair gel contains ethylene-glycol, a product
that is toxic if ingested and irritating for the eyes.
Keep out of the reach of children.
After use, do not dispose of the flask in the natural environment, but return it
to a CITROËN dealer or to a recognised recovery facility.
This repair kit is available from a CITROËN dealer.
See also:
"Motorway" function
System for indicating a change of lane
on a motorway.
Move the lighting stalk briefl y upwards
or downwards, without going
beyond the resistance point; the direction
indicators will fl ash 3 time ...
Boot (saloon)
1 Battery for vehicles with V6 HDi engine.
2 Pull strap (spare wheel storage).
3 Boot lamp.
4 6 CD changer.
Luggage securing rings
Use the 4 securing rings on the boot floor to secure your lu ...
Checks / Oil level
Log of alerts
This function allows you to display the log of alerts.
Press on button A. The following messages appear consecutively on the instrument
panel screen:
Tyre pressure check.
Mainten ...